How to complete information details for your outlet?
This first step will teach you how to fill out the information details for your outlets, such as adding your outlet names, address, opening hours, and even your outlet facilities and amenities! So don't be shy; show the world how fantastic your outlet is!
Source: @Rezervofficial
Start with outlet basic info
1. From the dashboard, go to the ‘Management’ menu.
2. Then go to the ‘Outlets’ tab.
3. Click the ‘+ Add Outlet’ button, then you’ll move to a new page called the ‘Add Outlet’ page.
4. In the ‘About’ section you have to fill in the details of your outlet, such as: Outlet name, Description, Contact number, and Email address.
5. After you finish adding the details of your outlet, click the ‘Next’ button.
6. In the ‘Upload Media’ section you have to upload an image that best represents your outlet, or you can also add a video.
The image file size limit is 500 Kb. If your image file size is bigger than that, then make sure you compress the image before uploading it.

Set lease duration and address
1. After you finish uploading the image and/or the video of your outlet, click the ‘Next’ button.
2. In the ‘Additional details’ section you have to fill in the info of your outlet ‘Lease duration’ and customise the ‘Slug’.
Slug is the url path of what your customers can see when they select your outlet.
Example: https://mybusiness.rezeve.com/orchard-outlet
3. In the ‘Address’ section you have to fill in your outlet's complete address details. In this section you can also add the information of how to reach your outlets by public transportation by clicking the ‘+ Add transport’ button.
You can check the Google Maps feature that appears on the right side, to make sure if you already fill in the correct details of your outlet’s address.

Set timing and facilities
1. After you finish uploading the image and/or the video of your outlet, click the ‘Next’ button.
2. In the ‘Timing’ section you have to fill in the info of your outlet’s opening hours and closing hours.
If your store's opening and closing times are consistent every day, you can select the 'Apply To All' text button.
3. After you finish adding the opening hours and closing hours of your outlet, click the ‘Next’ button.
4. In the ‘Facilities’ section you can specify what facilities that are available in your outlets. Follow these simple steps to fill in:
- Enter the ‘Number of Levels’ in your outlet.
- Then click ‘Add Facility’, to fill in the details of your outlet’s facilities information, such as Facility name, Image, Description, and Room capacity.
- Don't forget to set the ‘Status’ active, in order to allow assigning your classes to this facility.
- And then click the ‘Add’ button.
The term "facilities" refers to any rooms or areas that are available at your business location where events, like classes, take place. So, if you own a fitness centre with two rooms, such as a Fitness Room and a Yoga Room, you can specify it here.

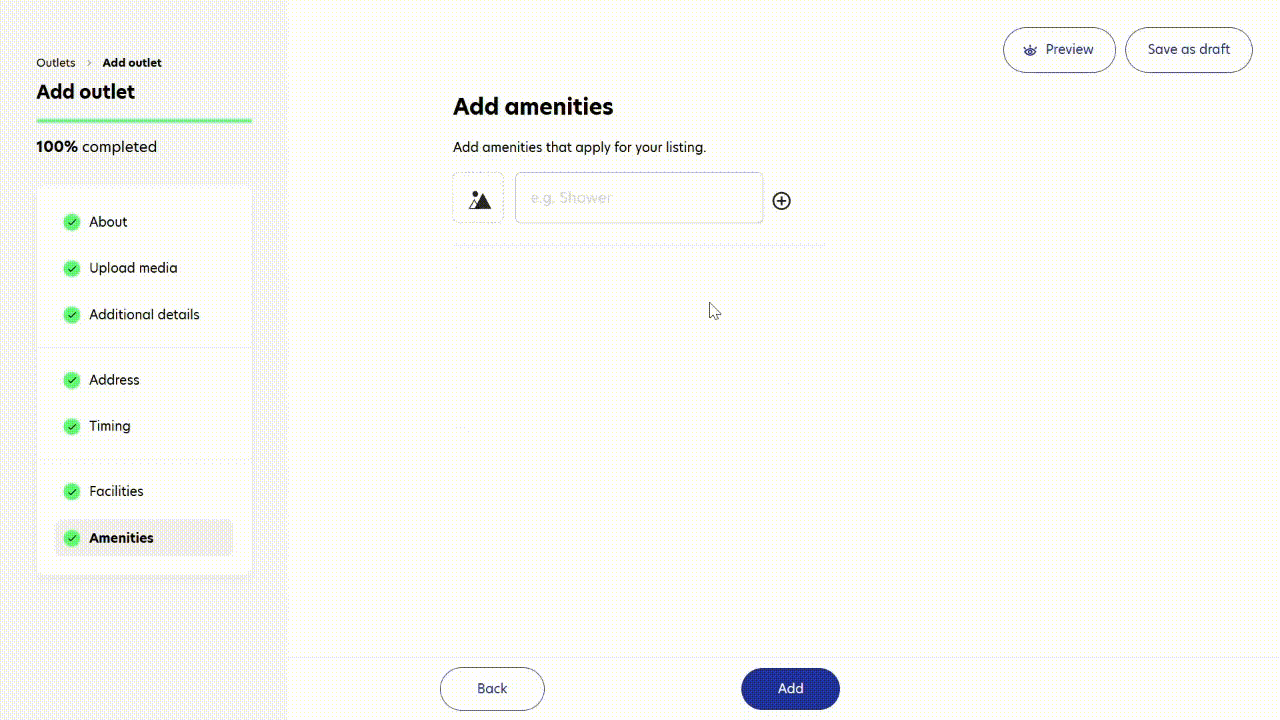
Set Amenities
1. After you finish adding the details of your outlet’s facilities, click the ‘Next’ button.
2. In the ‘Amenities’ section you have to fill in the info of what amenities that are available on your outlet. Follow these simple steps to fill in:
- Click the ‘Icon’ image button.
- Then select or search the icon that best represents the amenities that you want to add.
- Then click the ‘Add’ button.
- Fill in the blank column with the name of the amenities that you want to add.
3. After you have finished and are satisfied with all of the information of the outlets that you have added, click the 'Save' button.